Thursday, September 29, 2011

Halloween Decorations in Brooklyn

These folks are not afraid to say, "I'm into Halloween."  (Carroll Gardens)

In Brooklyn, people go a little crazy on Halloween. I respect that! Here are some early shots of September decorations put out by the die-hards. And on 10/1 everyone else starts in, so stay tuned...

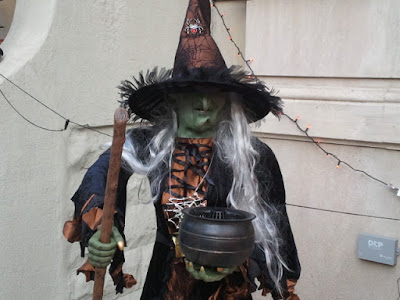
Close-up of spooky witch (Carroll Gardens)

 
Little witch climbing up a tree (3rd Place, Carroll Gardens)


The back of Mazzone Hardware on Court Street - ready for their annual Halloween party.
It's not easy to strtech those all spiderwebs! (Clinton Street, Carroll Gardens)
2nd floor - These folks go all-out for every holiday. (Court Street/Carroll Gardens)

Monday, September 26, 2011

Halloween Cupcakes (Pumpkin Muffins)


Nothing says autumn like pumpkin, and kids know it. A pumpkin muffin heralds in the season and makes a nice memory for a youthful individual.

These cupcake-muffins are super fluffy and nicely sweet and spicy and - though I hesitate to use the word - moist. I made these for the kids and they licked the muffin papers, a rousing endorsement.

I never use food coloring so I just stick a few plastic spiders on top (or other festive Halloween object). Oh, and my kids like these with plain old cream cheese on top. But don't forget the plastic doodad.


Serves: 24 (makes 2 dozen cupcakes)

Ingredients:
3 c. sugar (you can use less sugar, or substitute maple syrup or honey for part of it)
1 c. vegetable oil (you can substitute apple sauce for part)
4 eggs, beaten
16 oz. canned, unsweetened pumpkin
3½ c. flour (I use 1/2 whole wheat, 1/2 white)
2 t. salt
2 t. baking soda
1 t. baking powder
1 t. nutmeg
1.5 t. allspice
2 t. cinnamon
½ t. cloves
2/3 c. water


Preparation:
1. Preheat the oven to 350F.
2. Put cupcake papers in the muffin tins.
3. Stir together the sugar and oil.
4. Stir in the eggs and pumpkin.
5. Combine the dry ingredients in a separate bowl.
6. Mix the dry ingredients and water into the wet mixture, alternating. Don’t overmix.
7. Spoon the batter into the muffin tins.
8. Bake for 20 to 30 minutes or until a toothpick in the center comes out clean.
9. Let stand 10 minutes.
10. Remove from the pans and cool.


Love these eggs we get at the co-op.

Frost with cream cheese frosting: Cream together one 8 oz. block of cream cheese and ½ cup of softened butter. Blend in 1 t. of vanilla extract. Then slowly mix in 2 cups of powdered sugar.

Spread frosting amply on cupcakes. Top with festive spider or other doodad.

Happy Halloween! Happy Fall!


Wednesday, September 21, 2011

Halloween Game: Bobbing for Donuts

I see you!

Bobbing for apples is a tradition that is said to date back to 43 AD, when the Romans combined their festival honoring Pomona, the goddess of fruit and trees, with the Celtic Samhain (Halloween) festival.

A modern variation for little kids, who have a hard time chomping on an apple, especially with no hands, is bobbing for donuts.

Buy a box of plain, supermarket donuts (Entenmann’s are particularly delicious) and hang them by strings from a tree branch, clothesline, or even a doorframe. Set the kids loose with one instruction: No hands.

Do this after real food has been eaten, or no real food will be eaten.

By the way, in the olden days girls who place the apple they bobbed under their pillows were said to dream of their future husbands. Not sure about donuts.

Tuesday, September 20, 2011

Halloween Craft (or is it a Recipe?): Spider Ice Cubes

Let me out!


One of the many wonderful things about Spider Ice Cubes is that they turn any drink into a festive Halloween cocktail. So, say an individual at your Halloween Party is allergic to O.J., one of the key ingredients in your signature Witches Brew. Simply pop a few Spider Cubes into a glass of allergy-safe apple juice (or even water) and voila! Instant festivity.


Spider Cubes require three ingredients: plastic spiders, an ice cube tray and water. They take about five minutes to make (plus freezing time) and kids think they're super fun. 

I like to use spider rings - plastic spiders attached to rings - because then kids wear them on their fingers rather than suck on them once the cubes are melted. A helpful disclaimer would be that these are not for kids under 4, but even older kids need to be reminded to take the spiders out of their mouths, what can I say. Also, unless you have an ice-chewer, it takes quite a while to get down to the spider. 

This is a great craft (or recipe, you decide) for kids because the only messy thing is the water. 

This careful helper did not spill one drop! (But let the kids spill, it's just water.)

Spider Ice Cubes

Materials:
plastic spiders
an ice cube tray
water

Instructions:
1. Place one spider per cube into ice cube tray.
2. Have a helpful child fill the tray with water.
3. Freeze.

Boo!


Sunday, September 18, 2011

Halloween Activity: Shoe Toss Fortune-Telling

Left shoe upside down: Beware mean and selfish people!


Fortune-Telling is a key activity at any Halloween gathering. 2,000 years ago the Celts believed October 31st was a night particularly auspicious for seeing the future. Take advantage of the rift between this world and the afterlife to check out what lays in store for you and your kids.


If you can, have a quiet, darkened room set aside for the Fortune-Teller. Set the mood with candles, tarot cards, a crystal ball, things like that. Burn some incense if it doesn't make your neighbors think you're running a head shop. Like my neighbors would.

Let your fortune-teller be disguised enough that it isn’t too obvious that she is someone’s mom.

There are all kinds of ways to tell fortunes - with cards, tea leaves, palm reading, etc. But a Shoe Toss is particularly fun - kids think it's hilarious to throw their shoes up the air and have the fortune-teller read them when they fall.

How to tell a fortune with shoes:

First, have the subject take his or her shoes off and toss them in the air. After they land, read the ancient signs:

• If both shoes are upside down and not touching, the subject will travel her whole life.

• If they are both right side up and not touching, she will excel in business.

• Left shoe upside down: beware mean and selfish people!

• Right shoe upside down means the subject should be sure to follow her own dreams, not someone else’s.

• If both shoes are crossed, the subject will fall in love and get married soon.

• If the toes of the shoes are pointed in opposite directions, the subject is an independent thinker.

• (You can make up your own.)

Have fun and beware mean and selfish people!

Wednesday, September 14, 2011

Halloween Craft: Play-Doh Ghosts

Hi! I'm a scary ghost! Boo!


Play-Doh ghosts are just about the easiest Halloween craft ever.

Materials:
• White Play-Doh
• Black Sharpie

Instructions:
1. Fashion small ghosts out of white Play-Doh. These are basically just blobs with little arms and a head.
2. Poke black eye and mouth holes with a Sharpie.
3. Let dry.
4. Done.

In my opinion, kids and Sharpies shouldn't be in the same room together, but on this occasion, and under strict supervision, I think it'll be OK.

You may also like:
Halloween Recipe - Witches Fingers!
Halloween Craft - Luminary Candles
Our Essential Halloween ebook: Real Family Halloween Fun


Wordless Wednesday: Ghost

DD's drawing of a ghost. She's 4. I like the giant thumbs coming out of its shoulders.

Thursday, September 8, 2011

Don't Think Less of Me Because I Bought My Kid a $20 Bento Box

The new bento box with reflection of backyard cable wires - we must be in Brooklyn.

Those in my select inner circle (read: I have no friends) know that we send our kids to school with an assortment of junky, mismatched tupperware, most of which is not even tupperware - it's old Chinese food containers. 

Well, this year L.P. is a 2nd grader, old enough to realize how cheap his mom and dad are, AND his new school doesn't provide lunch. To him, this is a significant downgrade; school lunch was chicken nuggets, pizza and chocolate milk, items his parents will never willingly provide. So to soften the blow, Pete got him a beautiful, fabulous, twenty-dollar bento box. 

Of course, after he paid for it the (questionably) nice check-out person informed Pete he could get the same one at the Indian store for half price. Sheesh.


My first reaction when I saw the box was that it wasn't going to be big enough. It has to hold, after all, a sandwich, a piece of fruit and some veggies or cheese or something. 

But then I took it apart and saw that it has two medium-sized compartments and one small one. So you could definitely fit a sandwich in one compartment, maybe with some veggies crammed in, some fruit in the other and then some crackers or maybe a dip in the little container. So we've decided to give it a try. 

This isn't a product review, but in case you want to know what we bought it's called an Eco Lunchbox, and according to the label it does everything but take the recycling out for you. For twenty bucks, maybe it should do that, too.

But it's all about the kids, right?

The Best Halloween Invention Ever


These little battery-operated tea lights are possibly The Best Invention Ever, at least where Halloween is concerned. First of all, they flicker. Secondly, they're not very expensive (about a buck each) and you can set them up all over the house - inside and out - without fear of burning the place down. This is particularly helpful with little kids, who like to knock things over. 

That is not to say you can't use real candles on Halloween - on a party food table or up high on a mantelpiece, for example.  But isn't it nice to know the curtains in the living room aren't on fire?

Wednesday, September 7, 2011

Wordless Wednesday: Barnbrack Charms


These are the charms I baked into the last loaf of barnbrack I made. Then, when I served it, I was like, look out! Don't bite the penny! Don't swallow the thimble! Do you recognize the thimble, by the way? Yup, Monopoly.

If you get the thimble, it means you will never marry. (Or never prick your finger, you decide.) The bean and the ring both mean you'll marry soon. The coin means good financial luck and the rag means financial ruin and threads in your teeth. But you can bake whatever you want into your own barnbrack. Recipe: Here.

Saturday, September 3, 2011

Halloween Craft: Luminary Candles


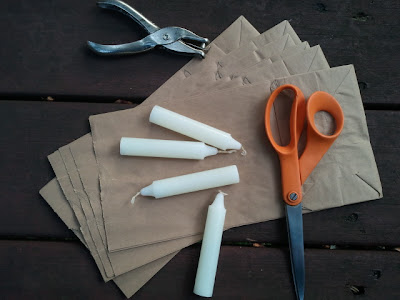
For an air of Halloween magic, Luminaries are a pretty touch. All you do is put about 2 inches of sand (or kitty litter) in paper lunch bags and add a candle. If you want to get fancy, cut some shapes and designs into the bags, but you really don't need to - even plain, old, brown paper bags are magical when lit from within.

If there aren't too many little kids around, use real candles. They're cheap and pretty. Otherwise, use those battery-operated tea lights, possibly the Best Invention Ever


A hole punch is fun for making patterns - go ahead and fold the bag up to get at the choice spots - you won't see a thing when it's all unfolded and lit.


Let your kids draw and cut whatever they want. It will all look beautiful outside and lit up.


Why can't adults be as original as kids? 


The finished product is guaranteed fabulous and the whole thing takes less than an hour. Have fun, let your kids have the scissors and Happy Halloween!

You may also enjoy reading:

Friday, September 2, 2011

Halloween Recipe: Witches Fingers


Witches Fingers

Witches Fingers is a classic Halloween recipe for kids that really does look like fingers - that’s why kids love it!

The recipe calls for you to chill the dough in the freezer – that’s because the dough is very sticky and needs to be cold and hard to cut into fingers. You can add more flour for a less sticky dough (and a simpler process), but that makes a less cheesey cracker. Up to you.

Serves: 10-20 (makes 30 fingers)

Ingredients:
5 T. butter
¼ lb. (about 1 cup) shredded cheddar cheese
3/4 c. all-purpose flour
2 T. cornmeal
1 large egg, beaten
salt
30 sliced almonds

Preparation:
1. With your fingers, mix together the butter, cheese, flour, and cornmeal until it’s pebbly.
2. Add the egg and mix with a wooden spoon and your hands until the dough holds together. If the dough is too sticky, add a little flour.
3. Scrape the dough onto a sheet of parchment paper. Top it with another sheet of paper and pat the dough into a ½ inch thick circle. Wrap the whole thing in plastic wrap and freeze it for about 10 minutes, until firm.
4. When the dough is chilled, take it out of the plastic and roll it - still in its paper - into a rectangle about 8 inches wide and 10 inches long, working carefully to create a nice, smooth surface. Rewrap the dough in plastic and return it to the freezer for 10 minutes.
5. Preheat the oven to 350F.
6. Peel off the top paper and use a sharp knife to cut the dough into 30 strips, each about ½ inch wide and 5 inches long. Place each strip on a large baking sheet. Sprinkle with salt, then use a sharp knife to draw knuckle lines in each finger. Press an almond into each tip for a fingernail. Shape the fingers to make them look knobby.
7. Bake the fingers until they are an even light brown, 10-15 minutes. Transfer to a rack to cool.